
How To Make Black Icing
It is quite tricky to produce the black icing from some of the ingredients. It takes so much creativity and strategy to make a perfect black icing. However, everyone can do this.In this blog, we will tell you the exact way to create the black icing step by step. So let’s start.
Step: 1: Buy your icing
You should decide the flavor at the very starting point of making black icing. You can choose any flavor among strawberry, vanilla, or chocolate. The amount of dye would depend upon the flavor you would choose.
For example, chocolate flavor needs less amount of black dye as its color is brown, which is close to black. On the other hand, vanilla and strawberry will need extra black dye as their original color is reciprocal to black.
Step: 2: Thicken your icing
While making black icing, you should always take care of the bleeding. Nobody loves bleeding from icing. The dye comes in two types. One is the gel, and the other is liquid.
We recommend you to use the gel as it thicken the icing while liquid makes the ice thinner and may cause bleeding. Once you use dye, then mix it until and unless the icing will get thicker as expected.
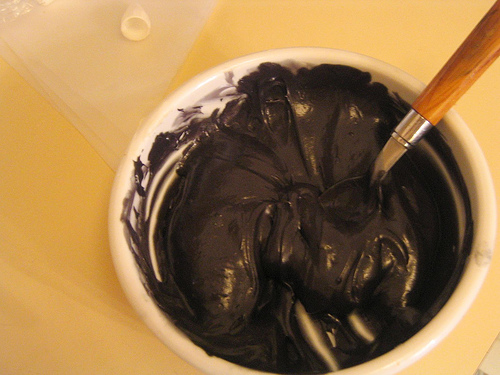
Step: 3: Transfer Ice to a bowl
It is not a necessary step if the ice gets thicker already, but if the ice is not getting thicker then transfer the icing in a bowl and mix it faster so that the ice gets thicker your ice won’t bleed once is get prepared.
Step: 4: Get the accurate black shade
Once you mix the dye with icing and make it thicker, then it’s time to check the black shade. Use dye so that it will not spoil the taste, and at the same time, you will get your ideal shade.
Step: 5: Mix the ice so that there would be no lumps
After you have managed the right shade and the right thickness, it’s time to make the shape of ice perfect. Mix the icing so that it will get its desired shape. You will do this thoroughly and carefully.
Step: 6: Taste the icing
Once you get done with thickness, shade, and shape, then it’s time to check the taste of icing. Here the overdoes of dye will spoil all the hard work. So, you should use dye limited to gain the perfect taste.
Step: 7: Cover your icing and give it some time
If you didn’t get the desired color, then it’s time to leave the icing for a few hours. Most of the time, you will get the desired shade, but in case if you don’t, then we recommend you leave the icing for a few hours so that it can regain its shade. Remember, don’t place the icing under the light as it may cause fade in color.
Step: 8: Get your icing done
Once you get your ideal icing, then just decorate it and enjoy icing.